CLICK HERE FOR FREE BLOGGER TEMPLATES, LINK BUTTONS AND MORE! »
Showing posts with label distress. Show all posts

Monday, September 23, 2013

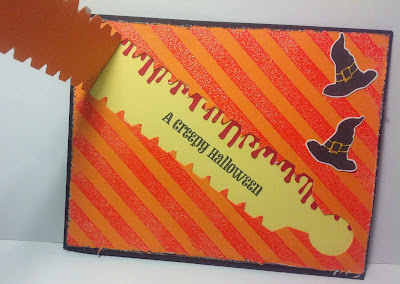
Witching You....


Hello Crafty Bloggers and
welcome today with


Today I created my card using
and
A Jillian Vance Design Stamps & Dies
 
&


Added  Scrapbook Adhesives by 3L®  E-Z dots
 Used Scrapbook Adhesives by 3L® 3D foam squares

 and made my own sticker using Scrapbook Adhesives by 3L®
Adhesive Transfer Sheet.

placed my cut image inbetween
the Adhesive transfer sheet.

I rubbed the transfer sheet with my bone folder
 
Removed my image and now
it has adhesive on the back.
Awesome :)


We have some great prizes!
Enter to win between Sept 23-27, 2013,
by commenting at A Jillian Vance Design blog,
Comment each day on each
Blog Hop post to increase your chances of winning!
One commenter will be randomly drawn from
each blog to win a stamp set and a selection of adhesives!


 Halloween Zipper 4 x 8 Stamp and Die Combo

Stripes 201 Background Builder Cling Stamp by Zig & Me


Thank You so much for stopping by my blog, please leave a comment. I would love if you become a follower and subscribe to my blog, great projects and inspiration added frequently.

Monday, October 29, 2012

Happy Turkey Day

Hello Bloggy Friends, this week at
the design team will
be posting Fall or Thanksgiving layouts all week.

For my layout I used stamp sets

I started out with a biege sheet of 12 x 12 paper.
I inked my edges with Tim Holtz Distress Ink.
I start off with Antique Linen then added Peeled Paint and
last a touch of Fired Brick.

Stamped Bloom'n Trio Stamp Set  on Kraft paper and cut out with
the Spellbinder Nestabilities
"Blossom Three"
Click HERE to view a quick demo video
on how to create a flower using
with "Blossom Three" dies.

Sentiments and image from Owl Give Thanks Stamp Set

For my photo mats I distressed the edges and added gold glitter
all around the photo mats.

On each corner I stamped the corner autumn leave stamp from
Embossed it in clear powder, I love how it turned out.


Thank You so much for stopping by my blog, please leave a comment. I would love if you become a follower and subscribe to my blog, great projects and inspiration added frequently.


Monday, October 15, 2012

Halloween Scrapbook Layout

Hello bloggy friends, this week the at A Jillian Vance Design the design team will
be posting great halloween inspiration. So make sure you check back daily with
A Jillian Vance Design.

Okay so for my project I created this Halloween scrapbook layout,
I used many AJVD products.

Paper is from DCVW "the midnight spell" paper stack.
The orange background I distressed the edges and inked with
Tim Holtz distress ink "black soot"
The bottom tree paper I just ripped by hand and attached it
to the bottom of the orange background.


Let's start here this witch is from  AJVD stamp set Witchy Poo Stamp Set
I cut her out and added some pop dots.
The moon is a 2" circle inked with "spiced marmalade" & "fired brick"
Tim Holtz distress ink


These cute bats are stamped directly on the orange background
and just added red glitter to eyes.
The bats are from AJVD Eye on Halloween Stamp Set

This one is my favorite, I love how this turned out.
The spider web is embossed with black embossing powder and
the web and spider are from AJVD Spooky Stamp Set

The journal tag is from AJVD Emerald Cut {die}mond Nesting Die Set
Inked with Tim Holtz "fired brick" and "black soot"
the BOO stamp is from AJVD Charming Holidays Stamp Set
The background paper I added Viva Decor "haematite" glitter liner
to all the trees, I love the effect of the trees. :)

The Halloween sentiment is from AJVD Spooky Stamp Set
and the circle stamp is from Charming Holidays Stamp Set

Thank You so much for stopping by my blog, please leave a comment. I would love if you become a follower and subscribe to my blog, great projects and inspiration added frequently.


Monday, January 2, 2012

Snowflakes Sentiments & Just Snow Flakes - By Jillian Vance

Happy New Year!!!! I hope everyone had a wonderful Christmas and New Year.  Well to start off 2012, today I will be featuring "Snowflakes Sentiments" & "Just Snow Flakes" Jillian Vance Designs from http://princessandthepaper.blogspot.com  I decided to create a thank you card, since I need to send so many out after the holidays.
This card is an A2 size card with white card base.


The background is 3-7/8 x 5"the color is light powder blue.
I stamped different sizes of snowflakes from "Just Snow Flakes" with "Broken China" distress ink. Then I sheer shimmer "Frost" spritz.  This gave it a beautiful shinny shimmer. Once the shimmer was try I distressed the edges, crumbled the paper and inked the edges with "Broken China"
Tied a a bow with silver ribbon from michael's, celebrate it brand.  I used " thank you snow much" sentiment and add a "Pear Pin" to hang the sentiment.

Thank you so much for stopping by.

Sunday, February 20, 2011

How to create a distressed paper flower

These flowers are very simple to create.  These are great for emblishments on cards or layouts.
First cut out 4 circles 3", 2-1/2", 2", 1-1/2 and 1"


Distress the edges and crumble all cirlces
Unfold all cricles

Assemble circles and add brad in center


Very simple and beautiful.


Published with Blogger-droid v1.6.7